System configuration
Contents
Short Description
Configure the system-wide settings according to the specifications of your organization. Users can override some of the default locale settings within their user settings page.
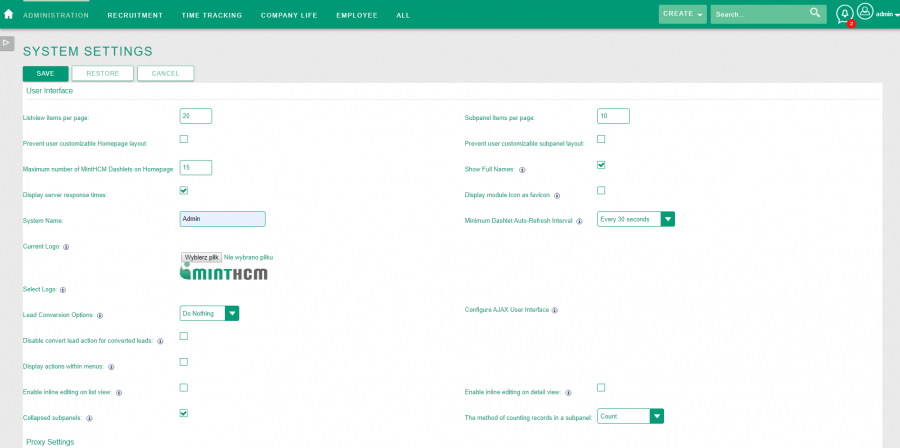
System Settings
In this section you can set up crucial configuration of your MintHCM instance
User Interface
Basic system settings.
Listview items per page - the number of records to display per page in the list view of each module.
Subpanel items per page - the number of records to display per page in supbanels.
Prevent user customizable Homepage layout - if selected, user is not able to change the homepage layout (including dashlet positions) according to their preferences
Prevent user customizable subpanel layout - if selected, user is not able to change subpanels order in modules.
Maximum number of MintHCM Dashlets on Homepage - the number of dashlets to display on homepage.
Show Full Names - display users' full names instead of their User Names in assignment fields.
Display server response times - it is displayed in bottom left corner of each page.
Display module icon as favicon - If you are in a module with an icon, use the module's icon as the favicon, instead of the theme's favicon, in the browser tab.
System Name - the name to be displayed on web browser's tab
Minimum Dashlet Auto-Refresh Interval - This is the minimum value one can choose to have dashlets auto-refresh. Setting to 'Never' disables auto-refreshing of dashlets entirely.
Current Logo/Select Logo - logo to be displayed in the left corner of the footer of the MintHCM application. Click Choose file to upload a logo of your choice (i.e. company logo). File must be .png. or .jpg format. By default it is MintHCM logo.
Lead Conversion Options - several options regarding activities when it comes to lead conversion:
- Copy - Creates and relates copies of all of the Lead's activities to new records that are selected by the user during conversion. Copies are created for each of the selected records.
- Move - Moves all of the Lead's activities to a new record that is selected by the user during conversion.
- Do Nothing - Does nothing with the Lead's activities during conversion. The activities remain related to the Lead only.
Configure AJAX User Interface - enable or disable the use of the AJAX UI for specific modules.
Disable convert lead action for converted leads - if a lead has already been converted, enabling this option will remove the convert lead action.
Display actions within menus - select to display DetailView and subpanel actions within a dropdown menu. If unselected, the actions will display as separate buttons.
- Enable inline editing on list view - select to enable Inline Editing for fields on the list view. If unselected Inline Editing will be disabled on list view.
- Enable inline editing on detail view - Select to enable Inline Editing for fields on the detail view. If unselected Inline Editing will be disabled on detail view.
Collapsed subpanels - if selected, subpanles in modules are collapsed. If not selected subanels are expanded.
The method of counting records in a subpanel - select a way to count records in subpanels.
- Count - all records are counted.
- Not count - records are not counted.
- Limited count - records are counted to a limit.
Proxy Settings
Proxy server settings.
Use proxy server? - if selected, it expands configuration options of proxy server address and authentication settings.
Proxy Host - provide host name.
Port - provide port number.
Authentication? - if selected, it expands proxy authentication options.
User Name - provide proxy user name.
Password - provide proxy password.
Click-To-Call
Calls integration settings.
Enable click-to-call for phone numbers - if selected, allows users to click on phone numbers to call using the phone dialer on their mobile device or a telephone app on a computer (SkypeOut®, etc.). The numbers must be formatted properly to use this feature. That is, it must be "+" "The Country Code" "The Number", like +1 (555) 555-1234.
Advanced
Developer mode, import and logging settings.
Validate user IP address - if selected users’ IP is validated.
Log memory usage - if selected, memory usage is logged.
Log slow queries - if selected, slow database queries are logged.
Slow query time threshold (msec) - determine the time in milliseconds after which query is regarded as slow.
Maximum upload size - determine maximum size of files to be uploaded.
Display stack trace of errors -
Developer Mode - enables developer mode. Caching is turned off, so the code changes to files are noticed immediately.
vCal Updates Time Period - use this setting to determine the number of months in advance of the current date that Free/Busy information for calls and meetings is published. To turn Free/Busy publishing off, enter "0". The minimum is 1 month; the maximum is 12 months.
Import - Maximum Number of Rows - specify how many rows are allowed within import files. If the number of rows in an import file exceeds this number, the user will be alerted. If no number is entered, unlimited number of rows are allowed.
Logger Settings
Log file configuration.
Log File Name - choose log file name. By default it is minthcm.
Extension - choose log file extension. By default it is .log.
Append after filename - choose if log filename should contain a date in preferred format.
Maximum log size - determine maximum size of log file.
Default date format - determine date format used in log file. By default it is %c, which means...
Log Level - determine the level of bugs to be logged.
Maximum number of logs (before rolling) - determine maximum number of log files to be kept at once. After this number is reached, oldest files are removed for the sake of new logs.
View Log - redirects to the log file displayed form MintHCM level.
Import Wizard
You can use the import wizard to easily import records into the system
It takes a few steps to import records into MintHCM:
1. Select data source - in this step you choose the module you want import data into.
2. Upload import file - select a file on your computer that contains the data that you would like to import or download the template to get a head start on creating the import file.
You can download a template by clicking Download Import File Template. The sample import file contains a header row of the module fields.
To upload a file click Choose file button and choose a file form your computer. Data in the file should be separated by a delimiter (e.g. a comma or a tab). It is recommended to use .csv files.
Here you can also choose if you would like the imported data to:
- Create new records only - use this option to create new records. Note: Rows in the import file containing values that match the IDs of existing records will not be imported if the values are mapped to the ID field.
- Create new records and update existing records - use this option to create new records. Note: Rows in the import file containing values that match the IDs of existing records will not be imported if the values are mapped to the ID field.
3. Confirm import file properties
Here is how the first several rows of the import file appear with the detected file properties. If a header row was detected, it is displayed in the top row of the table. View the import file properties to make changes to the detected properties and to set additional properties. Updating the settings will update the data appearing in the table.
View Import Files Properties - by clicking this button you will view properties of upload file and edit them to some extent, so they match your system properties and import goes smoothly. Make sure that data formats are correct.
Most important here are:
The field delimiter specifies the character used to separate the field columns.
Fields Delimited By: - The field delimiter specifies the character used to separate the field columns.
Header Row - Select if the top row of the import file is a Header Row containing field labels.
Fields Qualified By - the qualifier character is used to enclose the intended field content, including any characters that are used as delimiters.
Example:
- If the delimiter is a comma (,) and the qualifier is a quotation mark ("), "Cupertino, California" is imported into one field in the application and appears as Cupertino, California.
- If there are no qualifier characters, or if a different character is the qualifier, "Cupertino, California" is imported into two adjacent fields as "Cupertino and "California".
Note: The import file might not contain any qualifier characters. The default qualifier character for comma and tab delimited files created in Excel is a quotation mark.
Also in this step you can choose if file is being imported from Salesforce.com or Microsoft Outlook. If so, by choosing one of this options, import will be done with accordance to their standards and custom mapping will be applied.
4. Confirm field mapping
In the next screen you can confirm fields mapping and eventually adjust it or even add another fields to be mapped.
Make sure all required fields in module are covered. Otherwise, import will not be possible.
5. Check for possible duplicates
To avoid creating duplicate records, select which of the mapped fields you would like to use to perform a duplicate check while data is being imported. Values within existing records in the selected fields will be checked against the data in the import file. If matching data is found, the rows in the import file containing the data will be displayed along with the import results (next page). You will then be able to select which of these rows to continue importing.
Here you can also save the import settings. To do that provide a name of saved settings record in field below duplicate check table.
To start import click Import Now button.
6. View import results
On the last screen you are introduced to import summary. You can see how many records were created - they are also listed.
There are also duplicate report and error report.
If you are not pleased with import, you can abort it by clicking Undo Import button or repeat it by clicking Import Again button. By clicking Exit you will proceed to the module you imported records into.
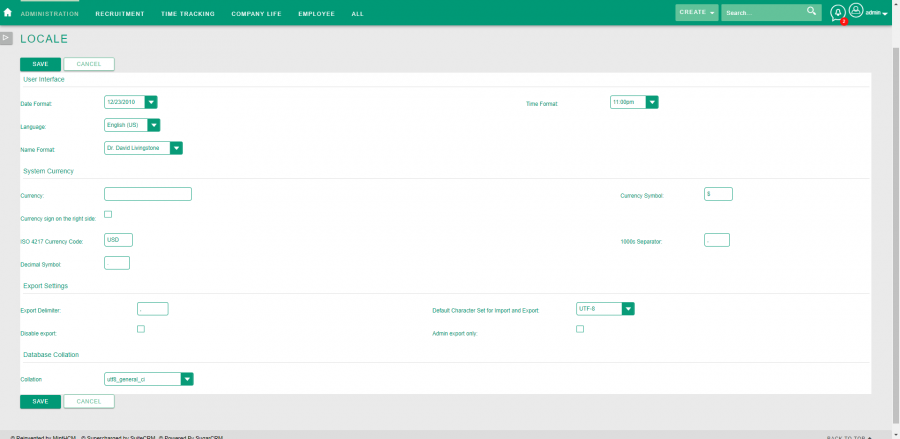
Locale
This section contains configuration of system date and time format, currency, etc. You can also set up export properties here.
User Interface
Date Format - choose preferred date format.
Time Format - choose preferred time format.
Language - choose preferred system language.
Name Format - choose preferred name format.
System Currency
Currency - determine currency name.
Currency Symbol - determine currency symbol.
Currency sign on the right side - select, if currency symbol should be displayed after the amount.
ISO 4217 Currency Code - in this field enter a three-letter ISO 4217 code that defines the currency name and currency symbol.
1000s Separator - choose your thousandth separator. For example, if it is „ . ”, the number will look like this: 10.000.
Decimal Symbol - choose your decimal symbol. For example, if it is „ , ”, the number will look like this: 100,75.
Export Settings
Export Delimiter - choose delimiter separating data in export.
Default Character Set for Import and Export - choose character set.
Disable export - if selected, export of data impossible.
Admin export only - if selected, only the administrator can export data from the system.
Database Collation
Collation - choose your database collation.
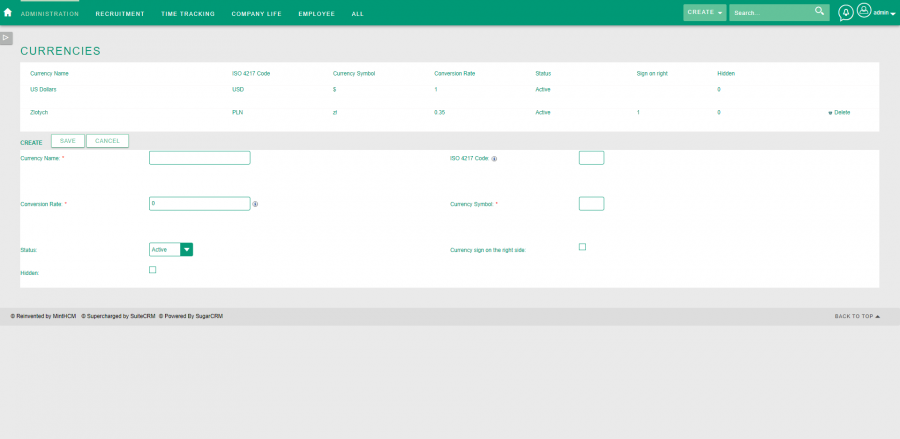
Currencies
In this section you can set up additional currencies and conversion rates. The default currency is set in Locale section.
At the top of the page, all currencies added to system are listed. You can add next currency below.
Currency Name - determine currency name. This field is required.
ISO 4217 Code - in this field enter a three-letter ISO 4217 code that defines the currency name and currency symbol. If the code is entered, Currency Name and Currency Symbol are autofilled.
Conversion Rate - determine conversion rate of currency. I.e. conversion rate of 0.5 for Euro means that 10 USD = 5 Euro. This field is required.
Currency Symbol - determine currency symbol. This field is required.
Status - currency can be either active or inactive in system. If it is inactive, it will not be taken into consideration by system.
Currency sign on the right side - select, if currency symbol should be displayed after the amount.
Hidden - if selected, currency is hidden from the users.
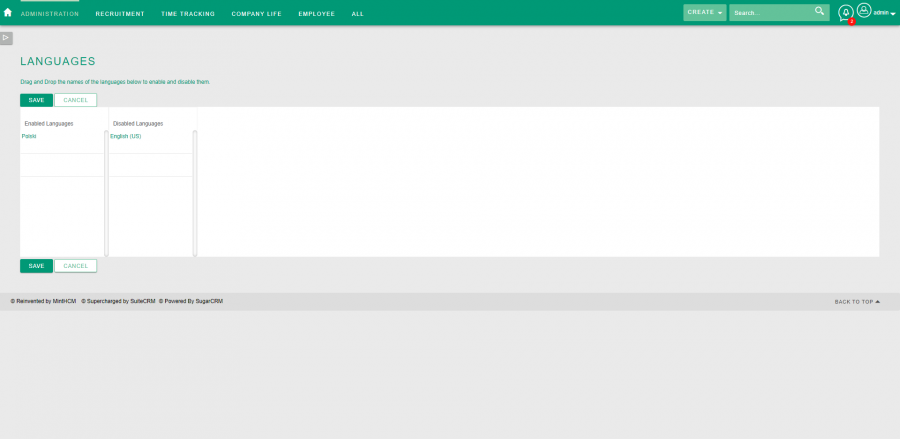
Languages
In this section you can select languages available in the system.
To add another language, you have to install additional language package. You can do it through Module Loader.
New languages are by default enabled. To disable a language, drag and drop the names of the language to disabled column.
Connectors
Manage connector settings.
Set Connector Properties
In this section you can configure the properties for each connector, including URLs and API keys.
Default connectors provided with MauticHCM are Facebook connector and Twitter connector.
Any additional package you install, may add its tab to Connector settings, thus its configuration options.
Enable Connectors
In this section you can select which modules are enabled for each connector. There is a tab for each connector. In there you can drag and drop modules form enabled and disabled columns of the table.
Map Connector Fields
If a connector involves mapping, in this section you can choose mapping of connector fields to module fields in order to determine what connector data can be viewed and merged into the module records.
Manage Connector Search
In this section you can select the connector fields to use to search for data for each module, if a connector involves searching.
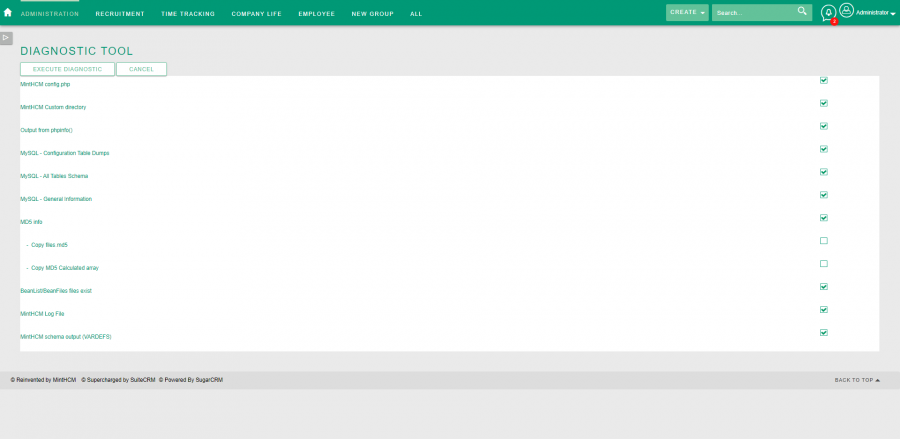
Diagnostic Tool
By using this tool you can capture system configuration to .zip file for diagnostics and analysis
Among others you can gather information about system configuration, database, server configuration and custom modifications of system.
To perform diagnosis select what information should be obtain and click Execute Diagnostic button.
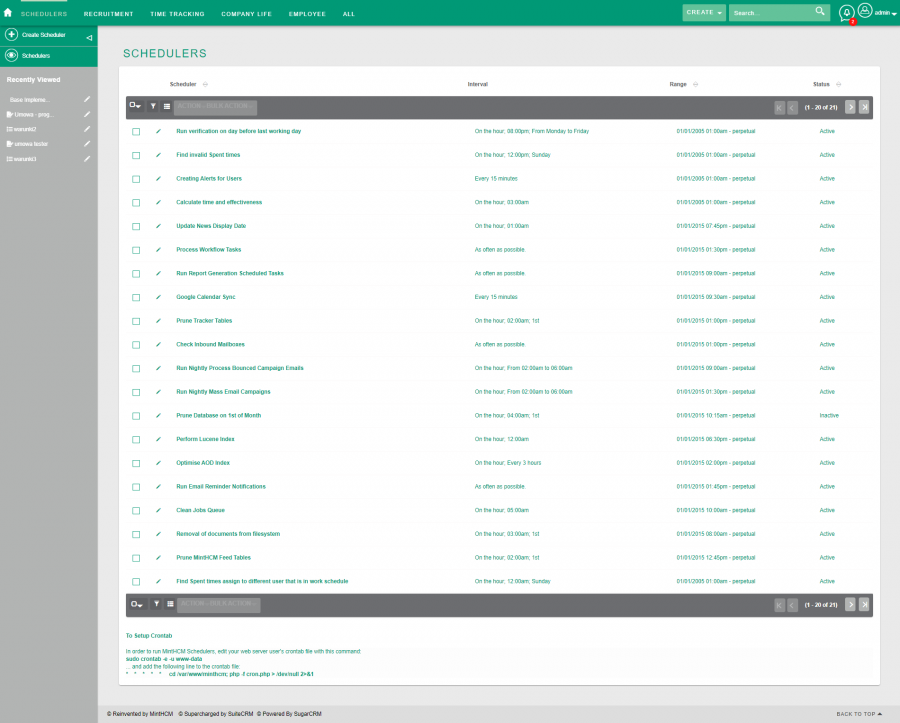
Scheduler
Scheduler Jobs configuration.
In this section you can create and edit Scheduler jobs running in the background of the server with MintHCM instance. they execute such functionalities as search indexing, workflows, email notifications, database maintenance and sending campaign emails.
Scheduler jobs run in predefined time periods or at certain moment.
Note that it is crucial for Scheduler Jobs running, to turn on background jobs for the MintHCM instance in your system. In Linux it is be done by adding cronjob to server’s crontab. In Windows it is done in Task Scheduler.
More information can be fond at the bottom of Scheduler page.
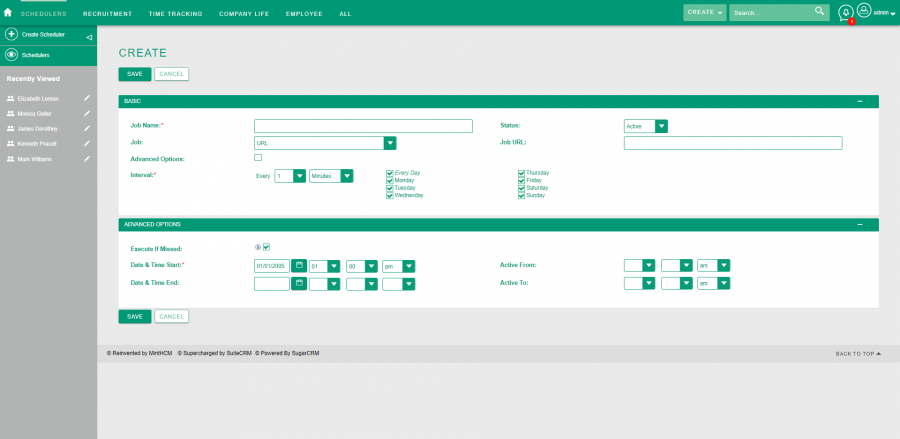
Create Scheduler
Creating new Scheduler Job.
To create new Scheduler Job, click Create Scheduler button at top left side of Schedulers section.
Creating or editing Scheduler Job you can set up basic configuration of the job:
Joba name - name to be displayed on the list. This field is required.
Job - choose form the list a job to be executed.
Status - if Active is selected, job will be preformed in scheduled time. If it is Inactive, it will not be executed.
Job URL - enter job URL.
Interval - you can set an interval of job execution. This is required. You can either do it by selecting using basic time configuration or, by selecting Advanced Options, use crontab notation.
In Advanced Options section you can schedule Date & Time of start and finish the job, so it will be executed only between this dates or a period of the job to be active.
If Execute If Missed option is enabled, the job will be executed as soon as possible, in case if for some reason it could not be performed at scheduled time. It is recommended to diable this option, if the job may take more than a moment to run.
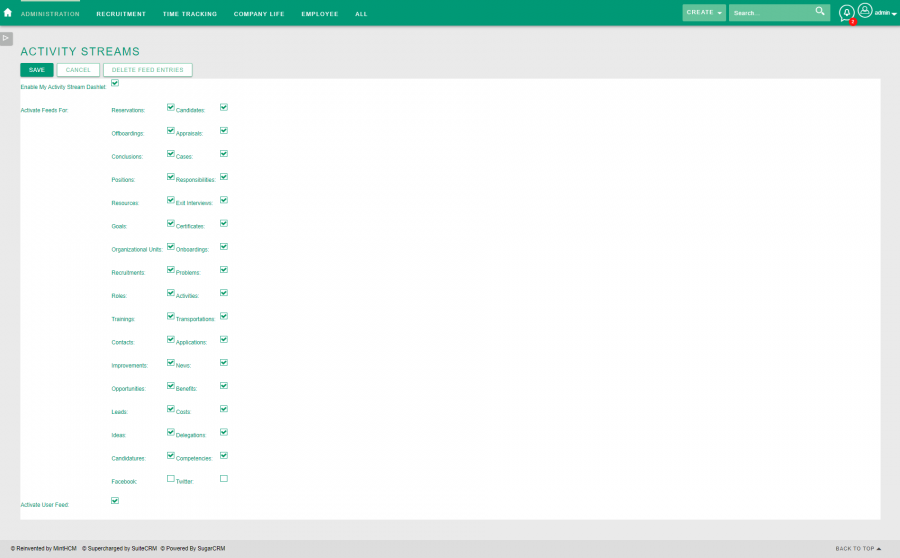
Activity Streams
In this section, user can enable the user feed and module feeds for the My Activity Stream dashlet.
Enable My Activity Stream Dashlet - if selected, enables an activity stream dashlet. This feature allows user to browse through modules' recent activities and users' activity feed.
Feeds can be separately activated for each module. To do so, you need to check a particular module on module list.
Users' feeds are activated by checking another checkbox. If it is active, user can post messages to all other users, in a chatbox.
Also, at the top of this section you can delete all feeds entries, by clicking Delete Feed Entries button. This may be useful, if you need to cut memory usage.
